
Having a Facebook Business Page is a great way to market your business on the platform, but just creating a Facebook Page isn’t enough. You need to get your Page verified to show your audience that it represents your authentic presence on the platform. The verified badge on your Facebook Page also helps it show up higher in search results, making it easier for potential customers to find your business.
Fortunately, getting your Page verified on Facebook isn’t too complicated. In this blog, we’ll show you how to get verified on Facebook in just seven simple steps. But first, let’s understand what it means to be verified on Facebook and why getting that little blue checkmark is so important.
Table of contents
- What is Facebook verification?
- The benefits of verifying your Facebook Page
- Facebook’s verification guidelines
- How to get verified on Facebook
- What to do if Facebook doesn’t verify your account
- Tips to get verified and stay verified on Facebook
- Frequently asked questions about Facebook verification
- Reach your audience more efficiently with Birdeye Social
What is Facebook verification?
Many businesses will likely see multiple Facebook Pages that are very similar to theirs. Some of them may be harmless fan-made Pages, while others are malicious imposters trying to scam their followers. Either of these Pages can confuse your audience when trying to find your Business Page. Facebook verification is made to avoid that by legitimizing your Page on the platform.
For example, let’s say one of your followers is trying to find your official Facebook Business Page. They search for the name of your business, but when they do, they find several Pages using your name. Three of them look like they could be your real Page, but only one has a little blue checkmark next to its name, clearly distinguishing itself from the other two Pages.
Facebook verification clearly sets your Page apart from the rest as the official Page belonging to you. Your audience can easily pick your Page, knowing that it’s the correct one, instead of clicking through multiple fan and imposter Pages to find yours.
The benefits of verifying your Facebook Page
Boost your brand credibility
Verifying your Page creates brand credibility on Facebook. When your audience sees your account is verified, they’ll be more likely to visit your business.
Separate yourself from imposters
Fake accounts and fan Pages can confuse followers when trying to find your Page. Getting verified makes sure your Page is authentic and separates you from Pages posing as you.
Boost your search presence
Facebook isn’t just a place to socialize with friends, it’s become a primary source of finding information. Just like Google, your Page will appear in Facebook’s algorithm when followers enter a search query related to your business. If you’re Facebook verified, you’ll be more likely to appear first in their search results.
[Free Guide] The ultimate social media marketing guide for businesses
Download Now
Facebook’s verification guidelines
Nearly any business can get verified on Facebook, but first, there are strict criteria you’ll need to meet.
- Authentic: Needs to represent a genuine person, business, or entity to be verified.
- Unique: Has to be the only one representing the person, business, or entity that you’re claiming. Facebook is very strict about verifying one account per person, business, or entity,
- Complete: Needs to have a Facebook Page, profile photo, about section, and recent activity, including at least one post.
- Notable: Has to represent a well-known person, business, or entity that is commonly searched for online. Facebook verified Pages that are talked about often in news sources and other publications, but they do not include paid promotional content as notable material for verification.
If you don’t meet these criteria, you can link to your Facebook Page from an official website, Instagram profile, or Twitter account to get verified.
How to get verified on Facebook
We’ve told you why getting Facebook verified is essential to grow your audience. Now we’ll show you how to verify your Facebook Page step-by-step.
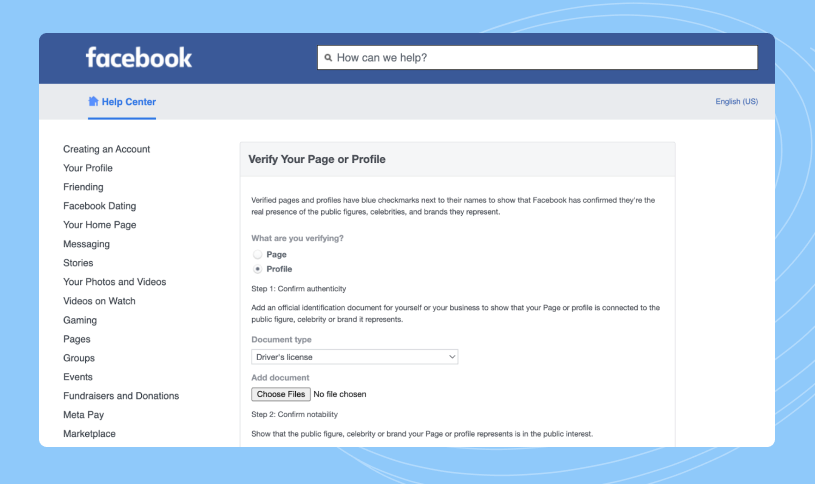
1. Go to the verification request form Page
First, go to Facebook’s verification request form. You’ll see an error message appear if you’re not logged in, so make sure you’re logged in to the Facebook account you want to verify before following the link.
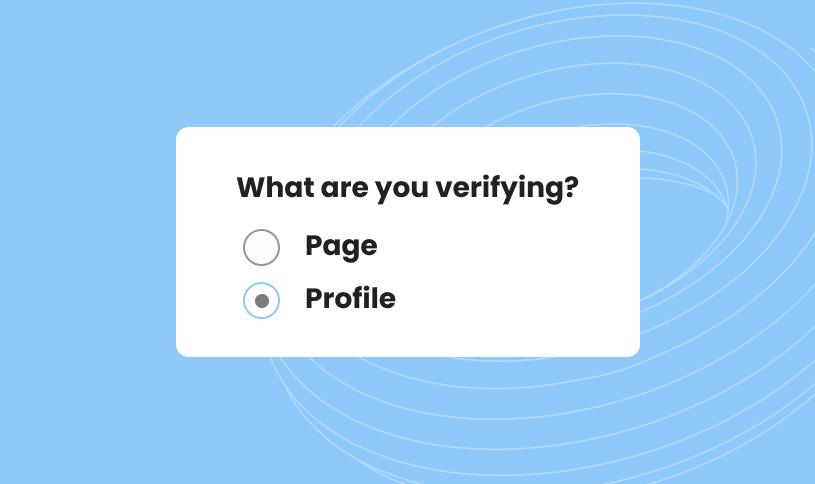
2. Choose what type of account you want to verify
In the verification form, you’ll see an option to verify a Page or a Profile. If you’re verifying your personal Facebook account, choose the Profile option. If you’re verifying the account you use for your business, choose the Page option.
3. Confirm your authenticity
Next, Facebook will want you to prove your authenticity to make sure you’re who you say you are. The identifying documents you can use to authenticate your Page are:
- Driver’s license
- Passport
- National ID card
- Tax filing
- Recent utility bill
- Articles of incorporation
You can select one of the above options in the drop-down menu and click “Choose files” to upload the necessary documents to confirm your authenticity. You’ll need a digital version of your documents, so make sure you can attach them as a PDF or scan them. There are various rules that Facebook has to follow when it comes to the identification you use to get verified, so it’s best to check their rules and regulations to make sure you upload the right documents.

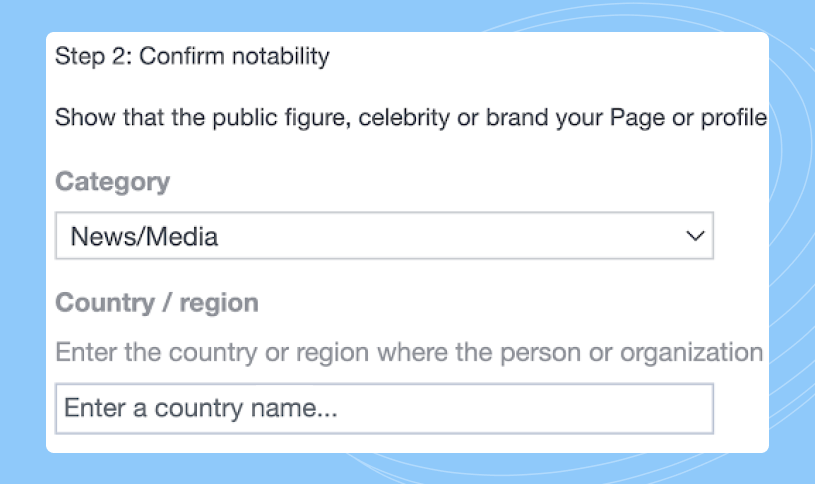
4. Confirm your notability
After confirming your authenticity, Facebook will want you to confirm your notability. This means you need to choose a category that Facebook uses to determine if your Page or Profile will interest your audience before giving you the verified checkmark. The categories you can choose from are:
- News/Media
- Sports
- Government & Politics
- Music
- Fashion
- Entertainment
- Digital Creator/Blogger/Influencer
- Gamer
- Business/Brand/Organization
- Other
Choose the category that best suits your Page or Profile, and Facebook will consider it when reviewing your verification request.
5. Add Audience and Also known as
You’ll also see some optional information you can add, including the “Audience” and “Also known as” fields. While this is optional, the more information you can provide, the more easily Facebook can verify your account. The “Audience” field allows you to explain the demographics of your general audience on Facebook, and the “Also known as” field lets you list any nicknames that you or your business would be called.

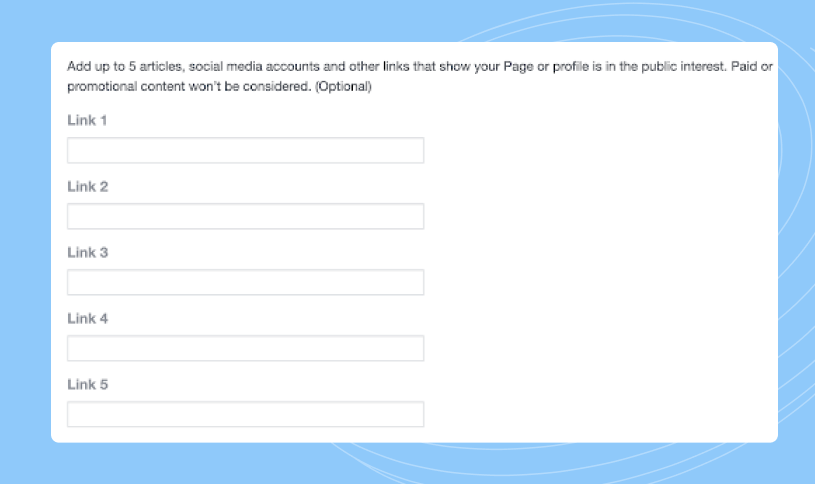
6. Add five articles that show your public interest
This is another optional field, but it’s in your best interest to fill it out. This allows you to list pieces of content that can help to get your account verified, like:
- Articles
- Pages
- Social media accounts
- Press releases
- Blogs
- Guides
This is a great way to show Facebook that you are worth verifying and that your audience will be genuinely interested in you after completing your verification.
7. Submit and wait for verification
Once you’ve added all the necessary information, click the “Send” button, and your verification request will be submitted to Facebook. Once it’s sent, you’ll have to wait for Facebook to review it and decide about your verification. The process can take anywhere from 45 hours to 45 days. If you’re verifying your Business Page, you should expect the verification process to take longer, as Facebook will need to manually review your verification documents to determine your authenticity.
What to do if Facebook doesn’t verify your account
If Facebook rejects your verification request, don’t panic. Requesting verification doesn’t guarantee you’ll be approved the first time. But you can resubmit your verification at a later date if you want to try again. There are a few things you can try to improve your chances of getting verified the next time.
- Contact Facebook and ask for more information about why your account wasn’t verified to help improve your chances the next time you submit. Facebook might have a very clear, fixable issue that prevented you from getting verified the first time.
- Do everything you can to create more high-quality content and be consistent with your posting. Facebook will notice when you have more and better content the next time you submit your verification request. Keep grinding it out and you’ll get your blue check
- Revisit Facebook’s verification guidelines. You might’ve accidentally missed one of the key requirements that Facebook sets to get your account verified. If your first request was denied, double-check that you have everything right in Facebook’s requirements.
- Cross-promote your Facebook Page on other accounts. Chances are you probably have another social media account for your business. Take the time to promote your Facebook Page on those platforms too so you can make the most out of your social presence.
Getting your verification request denied isn’t permanent. Take the time to approve and resubmit, and you’ll get your blue check in no time.
Tips to get verified and stay verified on Facebook
Whether you’re submitting your account for verification for the first time or resubmitting your verification request, you can do a few things to appeal to Facebook and make sure you get your blue checkmark.
Make sure your information is up to date
When verifying your account, the first thing Facebook will look at is your basic information. That includes your email address, website, bio, and description. If there are any inconsistencies, Facebook will likely deem your account as not credible and not verify your Page. Make sure all your information is correct and up to date to improve your chances of getting verified.
Be professional and consistent
When Facebook reviews your profile, they’ll look to see if the content your business posts on the platform matches the content you post elsewhere online. If you post content that is inconsistent with the content on your website or anywhere else online, you may be showing Facebook that your account is not credible and shouldn’t be verified.
That also applies to professionalism in the content you post. If you post content that’s not on-brand with your business or is grammatically sloppy compared to what you post on your website, Facebook will be less likely to approve your verification. Whenever you post to your Facebook Page, make sure that you are consistent, on-brand, and professional to get verified.
Make sure your links are correct
This is a simple tip, but it’s essential if you want to get your Facebook Page verified. When you’re connecting your Facebook account to your website, you have to make sure that you’re linking to a live page on your website, and you have to link back to your Facebook account from your website too. Facebook looks for that connection and expects to find it when they verify your account.
Build a solid, active audience
Having a large and active audience on Facebook is a great way to show your account is worth verifying. By marketing on Facebook effectively, you can generate enough audience members to make your Page credible and keep up with actively engaging them on your Page. The more active your account is, the more likely Facebook will be inclined to verify you.
Post regularly
If you’re not posting frequently, Facebook will likely not see your account as active enough for a verification status. Keep posting consistent, fresh content to show Facebook that you are an active part of the community and are worth verifying on their platform.
Respect community standards
If you haven’t already, you need to familiarize yourself with Facebook’s Community Standards. Violating any of these standards can result in Facebook taking action against your account.
Add two-factor authentication to your account
After all the hard work you’ve put into building and verifying your Facebook Page, it would be a shame if it got hacked. One of the best things you can do to protect your account is to add two-factor authentication. It essentially gives you another login method other than the standard login
page and makes it more difficult for anyone who isn’t authorized to access your account.
To set up two-factor authentication, here’s what Facebook recommends:
- Download and install a third-party authentication app onto the same device you use to access your Facebook account
- Go to your security and login settings
- Find “Use two-factor authentication” and click “Edit.”
- Click “Use Authentication App”
- Follow the instructions on your screen to connect the authenticator app to your account
You can also use an SMS message that sends an authentication code to your mobile device or use a physical security key connected to your account as verification methods.
Frequently asked questions about Facebook verification
While getting Facebook verified is straightforward, several factors determine your verification. Follow the guidance of this blog for your best chance at verification.
There is no exact number. However, having at least 500 followers is recommended to increase your relevancy and make Facebook more likely to approve your verification.
Verifying your Facebook account is free.
Facebook allows verified accounts on their platform to use sponsored posts that can make them some money.
In theory, anyone can get verified on Facebook, but it is less likely for a normal Facebook user to get verified due to the strict criteria that must be met.
Reach your audience more efficiently with Birdeye Social
Verifying your Facebook account can boost your audience and attract more followers, but you still need an effective way to reach out to them. Birdeye Social puts everything in one place, giving you a single platform for publishing, engagement, listening, and reporting across brands and locations. To learn more about how Birdeye can help your business reach more followers, get a free demo. Plus, click on the banner below to get your very own toolkit filled with easy-to-use templates to get you started right away.

Originally published